Showing posts with label Victorian Costuming Projects. Show all posts

Jun 22, 2017

Tips for Choosing Fashion Plates: HSF Challenge July 2017


Creating a historically inspired outfit has many challenges. Even deciding what to make can cause a lot of headaches because sometimes the endless possibilities can be overwhelming. Where to start? Using a Fashion Plate as a starting point makes the decision of what to sew so much easier because it gives you a focus.

But what aspects should you consider when picking a Fashion Plate?


What follows are my tips for choosing the Fashion Plate to use as the design base for your outfit.

For me, I have approximately 3 methods.

 Firstly, let’s go guilt free - The Fabric de-Stash Colourway Method


Anyone who sews will know the twin emotions of both joy and guilt that the mounting fabric stash fosters. So Step One is: go to your stash and pick two complimentary fabrics.

For example, from my stash I’ve a plain green and a floral pink stripe that work well together. (pictured below)


Step 2: Start a Pinterest Inspiration board, name it it after your fabrics and start collecting and pinning any fashion plates that have similar colours.

For example mine is: Green and Pink Outfit


Step 3: Now, start adding sewing pattern references within that colourway pin board that are as close to the fashion Plate as you can find.

This may take some time, but there’s no rush. Eventually one out of all Fashion Plates will stand out to you as the perfect outfit, and hopefully you’ll have already find the suitable sewing pattern and be all set to go.

Easy, huh? 

Here’s the one I’ve chosen:


Of course there’s no need to be limited to matching your fabric stash colours to the fashion plates colours. It just makes things easier.

But if you want to ignore colours, I suggest the The Fabric de-Stash Fabric-type Method.


Step One: From your stash choose a distinct fabric type: floaty muslin, rich brocade, white linen, etc.
For myself, recently I’ve been given some green velvet fabric (old curtains).

Step Two: Start a Pin Board using that fabric type as your theme.
Rather than start a “green outfits” Fashion plates pinboard, I’ve started “Velvet outfits” pinboard that includes extant dresses and other resources as well as Fashion Plates.
And because I’ve developed a recent interest in 1890s styles, I decided to limit my search to this era.

Using velvet and 1890s as my search parameters I selected this Fashion Plate (below) as my source for the outfit to make from the green velvet in my stash.


The last method I use, is what I call The Spark of Interest Method


It’s basically you see a Fashion Plate and are drawn to it by some distinct element within.

For example, I was instantly drawn to this Fashion Plate – one, because I mostly make Victorian outfits, and two – the main reason truthfully, is the dog in the plate is the same colour as one of my greyhounds, so bonus re-creating points!


And below you can see my Seaside outfit work in Progress. It's to the point it's wearable, but needs a few tweaks.

1870s historically inspired seaside outfit from Fashion Plate - work in progress


1870s historically inspired seaside outfit from Fashion Plate - work in progress


https://nz.pinterest.com/kuracarpenter/1870-seaside-costume-to-make/


If you're interested in making an 1870s seaside outfit, you may find the pinboard I created for bringing this fashion plate to life helpful.


Of course the trouble with the Spark method is, anything may catch your eye...


So, if you choose the Spark method, I recommend :


  • stay within your historical era comfort-zone. 
  • Also, unless you’re prepared to buy fabric specifically to match the outfit, concentrate on the silhouette, 
  • get the garments shapes right rather that worrying about the colours and fabric patterns.


Below are some helpful resources to completing your outfits:


1) I've been pinning Fashion Plates for a while, here's my selection of Fashion Plates from Regency to Edwardian Era


Vintage Fashion Plates


2) Jennifer Rosbrugh of Historical Sewing has a couple of wonderful blog posts: Bringing a Fashion Plate to Life and follow how she created her "Scotch and Soda" dress inspired by a fashion plate read about that HERE
Jennifer Rosbrugh of Historical Sewing
 3) What if you've found a Fashion Plate, but you want more info and the link to the original source is broken? Tin Eye is a reverse search engine for images.

BEST OF LUCK!


This Post was written as an Inspiration post for the HSF Historical Sewing Fortnightly Fashion Plates Challenge July 2017. Learn more about the HSF and how to join in here

Apr 16, 2014

HSF challenge #7 - In which it's awesome to have a head


Which came first? The head or the hat?
1880s inspired ladies Tall Hat - front and side views


Leaving classic philosophical debates to one side, here's my entry for the Historical Sewing Fortnight 2014 challenge #7 "Tops and Toes" an 1880s inspired Tall hat, which was created to accompany my 1888 costume here.


'before' photo

This is my third attempt at millinery, having made 2 spoon bonnets last year, here and here.

I made this one by taking apart a store bought sunhat (pictured to the left).

I will post a tutorial about how I made this 1880s tall hat soon.


'all done' photo
just the facts:
The Challenge: #7 'Tops and toes'

Fabric: the material is...whatever sunhats are made from. Er.. some kind of thick plastic threads (looks a bit like fishing line) which has been woven into strips.

Pattern: self-drafted

Year: 1880s
Notions: thread and self-made ribbons

How historically accurate is it? not very, this is def. an 'inspired by' design

Hours to complete: About two days

First worn: 28 March 2014

Total cost: under $7

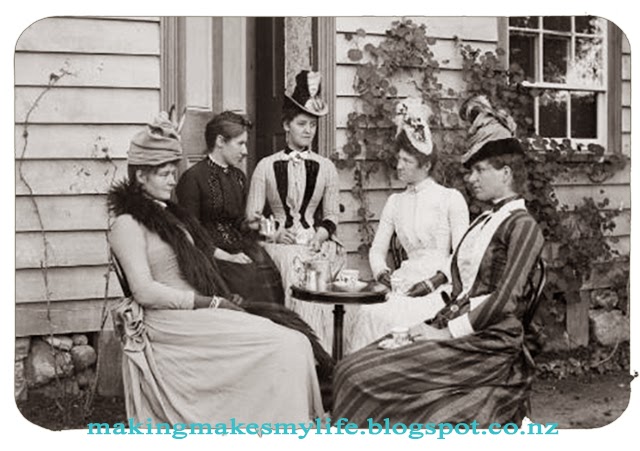
Women having tea outside the house of William and Lydia Williams in Napier, New Zealand. Dated between 1888-1899

The above photo (original source here) from the late 1880s is my favorite inspiration for my Tall Hat design, but you can see more sources by following my Hats or Victorian 1880s boards on Pinterest.

Apr 6, 2014

Sewing Milestone - Creating an 1880s outfit

A year ago as a novice sewer my historical costuming adventures began with my first Victorian Costuming Project, an 1860s Spoon Bonnet, followed by an 1863 outfit to mark the Dunedin Botanical Gardens 150th celebrations.

They were simple projects for a more simple time, chosen to help build up my sewing skills so one day in the distance future I might sew something from my fav decade, the 1880s.

Two months ago I knew I needed a complete outfit for an Images of Past Dunedin event by the end of March and like an American Idol contestant I wasn't going to let dubious skills stop me any longer so I took the 1880s plunge.

Here's what I came up with:

Olden-time posing under the Peasgoode Nonesuch apple tree


As making this outfit coincided [sort-of] with the Historical Sew Fortnightly challenge #5 'Bodice' today I'll talk about the main part of the outfit, the jacket.


My inspiration for the chevron back came from the extant garment below, full details HERE at Bonhams.
Extant 1880s dress with chevron back detail - Source = Bonhams

Details for Historical Sew Fortnightly
The Challenge:  #5 'Bodice'
Fabric: dark blue synthetic outer, poly-cotton inner

Pattern: 
I chose 'Ladies Costume' from the 1888 National Garment Cutter,


By the way, the 1888 National Garment Cutter is available FREE from the Library of Congress, aka the Internet Archive HERE

Pattern printed and back sections cut

I drafted the jacket using Adobe Illustrator, plotting out the Nat. Garment pattern exactly as stated and then merging it with my measurements in the form of a sloper  - drafted for me by a very kind friend, and without which I could not have made the jacket at all. Thank you S.W!!!

Year: 1888
Notions: thread, hook and eyes

How historically accurate is it? 
I give this 8 out of 10 for historicalness. Excluding the fabric's synthetic content, the pattern is 100% authentic, the construction is flat-lined, and sewn entirely on my 1937 Singer No15 which only does straight stitch - no reverse!

The Cat being helpful and my 1937 Singer
Jacket is flat-lined
1880s jacket in construction

Hours to complete: Many! Spread over two months I loss count. I really don't want to think about the time it took least it prove I'm crazy for doing things like this.

Problems encountered: Aside from the masses of time this took, I only had one major hiccup, it turns out I totally have one shoulder lower than the other! Who knew?

1880s Jacket - back not fitting quite right due to 'purse shoulder'...see the wrinkles on left shoulder
Argh - Fitting fail, had to adjust the left shoulder several times...but got there in the end :)

First worn: 28 March 2014, Toitu Museum

I really like this jacket, there's something quite severe about it that appeals to my odd sense of humour. I feel I should be standing outside the Sally Army banging a tambourine and haranguing people about the perils of drink! Hmmm, who can loan me a tamborine?


First worn at Toitu Museum
Total cost: jacket under $20
Fun Times Achieved: Hell yes.


I say, I do love a good silhouette, but does this make my bum look big enough??


Mar 25, 2014

Victorian Headdress Project - Part 2

I have been sew-busy (see what I did there) working to create my first 1880s outfit (skirt, jacket and hat) for an Images of Past Dunedin event I volunteered to do this coming Sunday, I just haven't haven't had time to blog about what I've been sewing, which really defeats the purpose of having a sewing blog, doesn't it?
I also hoped, as I had to create a jacket anyway, to enter it in the HSF 'Bodice' challenge #5- but that was due about 10 days ago :( Curse deadlines!

Anyhoo, aside from that, being as I am on the hunt for things which will aid me in myself imposed challenge of creating a suitable pattern for an 1850s - 1860s style headdress, I was very pleased to find two authentic 1862 patterns in an old book titled: "A history of costume" by Carl Kolher, that I had borrowed from the Dunedin public library.

And good news, a edition is available online and free to download as PDF through the Internet archive HERE

If you can't redraw these patterns yourself, rest assured in a week or so I plan to recreate them in Adobe Illustrator and so will post them here for everyone to share :)

Victorian 'cap' patterns from 1862

Mar 11, 2014

Challenge accepted: create a 1850s/60s style Victorian headdress

A while back a member of the Dunedin Victorian costuming group I'm involved with asked if anyone had a copy of the headress pattern Butterick 5663 which is now out of print.

No one did, but after looking at the cover pictures, I began to wonder just how hard it would be to try and make up a pattern for such Victorian headdresses myself. Famous last words? Maybe.

Being geeky I've started a pinterest board HERE to help inspire me and keep track of my research, .
and I hope it may be useful for others too.
The inspiration: Butterick 5663 - out of print

Butterick 5663

Butterick 5663


Butterick 5663


Dec 31, 2013

Garibaldi Shirt making - Collar mock up

I've been trying to figure out the collar for my Garibaldi shirt. The standing collar from the Simplicity shirt pattern I'm using to 'Frankenstien' parts is too small for me, so I've had to work out how to make it bigger. I basically just extended it from the fold, and it seems to be ok.

Trouble is, I have no idea just how tall a Garibaldi collar would have been. What I have made stands about 5cm tall. Is that too high I wonder?

Nov 19, 2013

Garibaldi Shirt project - Shaping the back

With making a Garibaldi-"Franenkstein shirt" being a shirt made up from several commercial patterns, I just wasn't feeling the way the back was progressing with the patterns I have gathered so far.

Although I haven't found any photos/illustrations which are speficially of the back of Garibaldi shirts, it seems to me the common back piece of 1850s and 1860s bodices have curving side-seams, so that the main back piece forms a sort of triangle. I really like the look of that cut too.

So in order to get that look I'm adding another pattern to the mix: Simplicty 4900 .


Simplicity 4900, which I have borrowed, has that triangle back in its dress pattern. Although it doesn't have the drop-shoulder I wanted. But somehow I managed to trace a new back pattern piece by blendingthe back from Simpilicty 4900 with the drop shoulder in the Very Easy Vogue V8193 back piece.

I don't know how I managed it, but it seems to be working...

Aug 31, 2013

Making an 1860s Garibaldi Shirt - Part 2

My Garibaldi shirt is well under way. Here are some progress shots of the first mock-up using calico. So far I've stuck to using the Very Easy Vogue pattern V8193 which can be seen in Part 1. As you can see the front bodice panels have a single dart at the waist and a pronounced drop shoulder - the drop shoulder is a key characteristic of 1860s clothes. So far the shirt is very plain, dare I say dull, but I like the way the bodice curves in at the waist.
The sleeves are a bit volumputious--volumness--fricking huge with pleats at the shoulder. And I can't tell at this early stage if the sleeves will look right until I put cuffs on them...

Garibaldi Shirt making in progress

For fans of old sewing machines may be interested that I'm sewing this shirt using my vintage Singer 15 circa 1937. Made in Scotland the machine was purchased new by my mother-laws family in Malaysia. Originally a treadle powered machine, it was converted to an electric motor in the 1970s. That means it's a little temperamental to operate - starting and stopping is a process of winding up or down. It's not a fancy machine by any standards and only has one function: straight stitching - forward - it lacks reverse.

But it gets the job done and perhaps this low-tech way gives me a slightly more authentic experience in the making of the shirt as originally they would have been hand sewn. Although mass-produced sewing machines started being sold in the 1850s, it wasn't until the late 1860s when they became a common (but expensive) household item.

Obligatory Cat-on-Fabric-photo & 1937 Singer 15

Aug 13, 2013

Making an 1860s "Garibaldi" Shirt - Part 1

I've been thinking about what to make next, and from the research I've done I've decided to go with a Garibaldi shirt, as it will go nicely with the skirt I already made for my 1863 outfit. The style was very popular during the early 1860s, if you want to learn more there is a really good article on 1860s clothing HERE from the University of Vermont.

Thanks to the Internet Archive, I was able to download an 1862 copy of Godey's Lady's Magazine, which has several pictures of Garibaldi shirts, I've complied them below, for your viewing pleasure.
The Garibaldi Shirt - Images complied from Godey's 1862 edition

As to drafting a Garibaldi shirt pattern, I'm playing the mad scientist and my plan is to make my own 'Frankenstein-Garibaldi' by cobbling pieces from various patterns I've bought in op-shops.

The Bishop-style sleeves in the two Vogue patterns on the left look about right to me, and the Very Easy Vogue has the drop-shoulder I'll need. The Simplicity pattern has a collar that I think will work...


[Cue the lightening and the maniacal laughter]


Jul 19, 2013

1863 Outfit to Mark the Dunedin Botanical Gardens 150th

Made it! Just not on the actual day...


This is only my second ever Victorian Costuming Project.
I drafted the spoon bonnet pattern myself, an earlier version seen here. The skirt is simply 4 plus metres of panels that have been box-pleated at the front and sides, and cartridge pleated at the back. It's worn over my cage crinoline petticoat hybrid. The jacket is based on the Spring Paletot pattern a free pattern available through resources provided by The Ladies Treasury

Now what to do with my 1863 outfit? As luck would have it, Otago Boys High School are also celebrating their 150th this year. I wonder if they'll have a fete open to the public? If not, maybe I'll go pose outside the gate. It's all about the photo-op after all. ;p

Happy costuming everyone, and Happy 150th Dunedin Botanical Gardens! My, you are old!

Jun 25, 2013

Project Petticoat - Stage 3

At last I have found a suitable product to provide the internal support for my cage crinoline petticoat hybrid. I was in Mitre10 and saw a gardening bag kit that had 3 steel hoops to support the bag - and it had been marked down from $50 to just $5. Yay!

So the petticoat is sorted, but to finish my 1863 outfit in time for the botanical gardens 150th celebrations, I still need to hem the outer skirt, attach sleeves and trim to the bodice, and I haven't even started on a bonnet.
I estimate I have about two weeks work still to do. Unfortunately the 150th celebration is this weekend. I don't think I'm going to make it...

May 23, 2013

Project Petticoat - Stage Two

Using an absolutely massive 4 metre length of calico I acquired recently, [Making Makes My Life: Project Petticoat: Stage One  ] the construction of my crinoline petticoat is going well but I've come a bit unstuck on what to use for the boning. I should say, use cheaply.

Because after much thought it occurred to me that flat sprung coils used for drain snakes might be perfect - and have the bonus of being closest modern equivalent to what cage crinolines were made of.

I searched every local $2 shop with no luck, only to find the type of drain snake I needed at Mitre10 - $12 for a 4.5 metre coil.

I bought one just to try, and it works perfectly, holds it shape but is also flexible. But my petticoat has 4 channels, so I'd need to buy 2 more drain snakes, putting the project well over budget.

I'll have to think about this. I was hoping to get my whole 1863 outfit done for under $40.

making my crinoline petticoat hybrid - stage 2


Apr 16, 2013

Project Petticoat: Stage One

In making an 1860s outfit the secret to getting the skirt 'poofing' nicely is a Cage Crinoline. As the name implies it was just that - a cage - made of graduating hoops which were strapped on with the under garments. A revolution in its day this contraction held aloft a lady's skirts, maintaining the fashionable dome-shape, while also reducing the weight and freeing the legs from being entangled in multiple layers of cloth petticoats.

Dresses in the 1850s were supported by a round hoop system but by the 1860s the fashionable silhouette had become elliptical, flatter at the front with the skirts swooping out behind.

There are plenty of great companies out there that still make crinolines/patterns today, like Truly Victorian.
But they're way over in America, and as I'm not too concerned about this being historically accurate construction-wise, I figure why not try and make my own?

My starting plan is to make a hybrid Petticoat Crinoline - basically a boned petticoat. I've been experimenting with mocking one up using a striped sheet that I sewed in channels for boning. 

Project Petticoat - First Mock-up

I think if I pad the hips with my bustle pad the shape will be OK, but I can see from this test run I'm going to have to make it much, much bigger. The bottom hoop has a 2 metre diameter. I think I need to make about 3 metres. Epp! SO MUCH FABRIC!

Good thing I bought a huge calico curtain from Toffs for only $2 - as pictured on the washing line. Have to wait and see how it turns out...
Project Petticoat - stage 2: Build it Bigger

Apr 5, 2013

Original Spoon Bonnets from 1863

Browsing online I found a fantastic group photo of women wearing spoon bonnets - I can see with mine I'm going to have to add a big bow under the chin, and also stuff a heap of ruffles/flowers under the brim.

"The First Board of Officers of The Iowa Soldiers Orphans Home. Sept. or Oct. 1863, Davenport, Iowa”


The original link to the photo is HERE

Apr 3, 2013

My First Victorian Costuming Project: 1860s Spoon Bonnet


Having recently become interested in Victorian costuming I've been wondering where to start. What to make first? I love the fashions from the 1870s and1880s when bustles ruled supreme and flounces and pleating burst from every seam, but I'm a beginning sewer, I'm using the skills taught to me in high school, so as much as I hate to admit it, trying to make an 1880s outfit would be a bit ambitious.

And then I learned something that gave me an idea.

Both the Dunedin Botanical Gardens and Otago Boys High School were founded in 1863 and are celebrating their 150th this year, and it occurred to me that Dunedin has a wealth of buildings and venues built during the Victorian era and over the next few decades many more establishments will celebrate such milestones.

So my idea is: I will begin my costuming journey in 1863, when clothes and fashions were simpler, and as time marches on, hopefully my sewing skills will too.(either that, or I will get bored and do something else)

Wanting to start with something small, and after a bit of research on fashions in the 1860s, I decided to tackle a Spoon Bonnet. My decision was partly due to finding a tutorial HERE which showed me how to get the brim shape.
>>I didn't follow all her steps, like lining my hat with hessian instead of cardboard, because I wanted it to be washable, also I sewed it flat so it could be reversible. [My construction is far from historically accurate, but I could do a tutorial if people are interested.]

Constructing an 1860s inspired Spoon Bonnet


Above are a few pictures from when I made the Spoon Bonnet, (it took about 4 days to make!) and a photo from its first outing at Brighton Gala Day - now I just have to make the rest of an 1860s outfit. The Botanical Gardens celebrate their founding on the 30th of June 2013, I guess that gives me about 3 months...