Showing posts with label Historical Sew Fortnightly. Show all posts

Aug 30, 2017

Inspiration Post: HSF Seen Onscreen Challenge

I imagine every person interested in period dramas has seen an actor outfit on screen and thought "Want!"
 
Colin Firth as Mr Darcy in the BBC's Pride and Prejudice (1995) BBC


Because if you're handy with a sewing machine - why not? You can make yourself an outfit inspired by something seen onscreen. It's been happening for years - before TV and movies, Books and Plays inspired Fashion trends - check out the Dreamstress blog post on the 1870s sensation that was the Olivia Bonnet
 
Where to start? Firstly, the thing to remember with period dramas is depending upon the show's budget, target audience and the taste of the costumer designer, just because you're watching a period drama doesn't mean the clothes are historically accurate. *cough* Reign.*cough*

If you're creating an item for the 2017 September Historical Sew Fortnightly Seen Onscreen Challenge -- Don't know what that is? Details here -- Then historical accuracy matters, so it's time to do some research. May I recommend starting with  Frock Flicks where quote: "we rip into Hollywood’s attempt at historical costuming and talk about exactly why they’re not accurate to the eras."

If you're an Outlander fan, then you have to check out the American Duchess website - not only did these talented designers team up with Simplicity to patterns inspired by the TV show, they are also sharing "Outlander Pattern Hacks" revealing how to make those same patterns more historically accurate.  Also you must check out the American Duchess YouTube channel.


And if, you don't have a movie or TV show already in mind, then here's some costuming eye-candy to get you inspired:

Natalie Dormer as Seymour, Lady Worsley in The Scandalous Lady W (2015)

Jennifer Ehle as Elizabeth Bennet - Pride and Prejudice (1995)

 
Keira Knightley as Georgiana, Duchess of Devonshire in 'The Duchess' (2008)


MyAnna Buring (plays Tall Susan) - 'Ripper Street' season 3

Natalie Portman as Anne Boleyn in The Other Boleyn Girl (2008).

Claire Skinner as Fanny Dashwood - Sense & Sensibility (TV Mini-Series, BBC, 2008)
"Ruth 'Ruby' Pratt" (Victoria Hamilton) and "Prudence 'Pearl' Pratt" (Matilda Ziegler), TV series  Lark Rise to Candleford
Gabriella Wilde as Caroline Penvenen in Poldark (TV Series, 2016)


And don't worry, I haven't forgotten the gentlemen:

Colin Firth as Mr Darcy Pride & Prejudice, BBC (1995)
Matthew MacFadyen as Mr Darcy Pride & Prejudice (2005)
Matthew Rhys as Mr. Darcy in Death Comes to Pemberly, based on the novel by P D James

Hmmm, any more Darcys?


Jun 22, 2017

Tips for Choosing Fashion Plates: HSF Challenge July 2017


Creating a historically inspired outfit has many challenges. Even deciding what to make can cause a lot of headaches because sometimes the endless possibilities can be overwhelming. Where to start? Using a Fashion Plate as a starting point makes the decision of what to sew so much easier because it gives you a focus.

But what aspects should you consider when picking a Fashion Plate?


What follows are my tips for choosing the Fashion Plate to use as the design base for your outfit.

For me, I have approximately 3 methods.

 Firstly, let’s go guilt free - The Fabric de-Stash Colourway Method


Anyone who sews will know the twin emotions of both joy and guilt that the mounting fabric stash fosters. So Step One is: go to your stash and pick two complimentary fabrics.

For example, from my stash I’ve a plain green and a floral pink stripe that work well together. (pictured below)


Step 2: Start a Pinterest Inspiration board, name it it after your fabrics and start collecting and pinning any fashion plates that have similar colours.

For example mine is: Green and Pink Outfit


Step 3: Now, start adding sewing pattern references within that colourway pin board that are as close to the fashion Plate as you can find.

This may take some time, but there’s no rush. Eventually one out of all Fashion Plates will stand out to you as the perfect outfit, and hopefully you’ll have already find the suitable sewing pattern and be all set to go.

Easy, huh? 

Here’s the one I’ve chosen:


Of course there’s no need to be limited to matching your fabric stash colours to the fashion plates colours. It just makes things easier.

But if you want to ignore colours, I suggest the The Fabric de-Stash Fabric-type Method.


Step One: From your stash choose a distinct fabric type: floaty muslin, rich brocade, white linen, etc.
For myself, recently I’ve been given some green velvet fabric (old curtains).

Step Two: Start a Pin Board using that fabric type as your theme.
Rather than start a “green outfits” Fashion plates pinboard, I’ve started “Velvet outfits” pinboard that includes extant dresses and other resources as well as Fashion Plates.
And because I’ve developed a recent interest in 1890s styles, I decided to limit my search to this era.

Using velvet and 1890s as my search parameters I selected this Fashion Plate (below) as my source for the outfit to make from the green velvet in my stash.


The last method I use, is what I call The Spark of Interest Method


It’s basically you see a Fashion Plate and are drawn to it by some distinct element within.

For example, I was instantly drawn to this Fashion Plate – one, because I mostly make Victorian outfits, and two – the main reason truthfully, is the dog in the plate is the same colour as one of my greyhounds, so bonus re-creating points!


And below you can see my Seaside outfit work in Progress. It's to the point it's wearable, but needs a few tweaks.

1870s historically inspired seaside outfit from Fashion Plate - work in progress


1870s historically inspired seaside outfit from Fashion Plate - work in progress


https://nz.pinterest.com/kuracarpenter/1870-seaside-costume-to-make/


If you're interested in making an 1870s seaside outfit, you may find the pinboard I created for bringing this fashion plate to life helpful.


Of course the trouble with the Spark method is, anything may catch your eye...


So, if you choose the Spark method, I recommend :


  • stay within your historical era comfort-zone. 
  • Also, unless you’re prepared to buy fabric specifically to match the outfit, concentrate on the silhouette, 
  • get the garments shapes right rather that worrying about the colours and fabric patterns.


Below are some helpful resources to completing your outfits:


1) I've been pinning Fashion Plates for a while, here's my selection of Fashion Plates from Regency to Edwardian Era


Vintage Fashion Plates


2) Jennifer Rosbrugh of Historical Sewing has a couple of wonderful blog posts: Bringing a Fashion Plate to Life and follow how she created her "Scotch and Soda" dress inspired by a fashion plate read about that HERE
Jennifer Rosbrugh of Historical Sewing
 3) What if you've found a Fashion Plate, but you want more info and the link to the original source is broken? Tin Eye is a reverse search engine for images.

BEST OF LUCK!


This Post was written as an Inspiration post for the HSF Historical Sewing Fortnightly Fashion Plates Challenge July 2017. Learn more about the HSF and how to join in here

Jan 31, 2015

HFS January 2015 Challenge: Foundations

When I became interested in sewing historical and steampunk garments the one item I was almost certain I would never make was a corset.

You know where this is going, right?

And being a slow sewer, a slower, if you will, gosh darn it, I'm not finished. Today the challenge is due, so better something than nothing I felt.

And actually this is a sewing milestone for me, not only my first corset, but the first time I've used a commercial pattern which I bought new (and not a vintage thrifty bargain or indie download) Simplicity 9769.

This pattern is a dream! I may just become a commercial convert. (Nooo!) The pieces lined up perfectly, I've only had to do a few minor fitting changes which even my intermediate sewing skills could handle. The whole thing was nowhere near as scary as I imagined it would be.

Full disclosure, this corset isn't intended as a historical replica. It's part of my investigation into corsets and back support. So the two main adjustments I've done is I've swap the busk with a zipper, and the grommets with fabric loops, both substitutions being to make it washing machine friendly.

One final apology, I'm having a little trouble uploading my photos today, and I just don't have the energy to fix it, so the rest will have to come later... *sigh*


Dec 16, 2014

HSF 14 - Challenge # 22 - Gentlemen = Making an 18th century "Darcy" Shirt

Happy Jane Austen Day! 239 years ago today on the 16th of December 1775, Jane Austen was born.

Since today (nearly) co-insides with the Historical Sew Fortnightly 2014 challenge #22, I wanted to share a "Darcy" shirt I made.
18th century men's "Darcy" shirt - Front view

I made the shirt using instructions from "A Typical Eighteenth Century Military Shirt: A practical construction guide by Judith Wicker". The guide is very easy to follow, and I believe historically accurate. 

[You can find a copy of this pattern by doing a Google search, I 'm not posting the link because I couldn't find the original source, but I think it came via the NWTA. ]


Historical Sew Fortnightly 2014
The Challenge: # 22 - Gentlemen
Fabric: heavy cotton (old bedsheets)
Pattern: "A Typical Eighteenth Century Military Shirt: A practical construction guide by Judith Wicker".
Year: Eighteenth Century
Notions: buttons, thread
How historically accurate is it? Very. 80-90% originals might have been made in linen, I made slight mistake on the neck opening (explained below) and I did use the sewing machine...
Hours to complete: 6-8 hours across two days
First worn: Unworn
Total cost: under $10


Darcy shirt - side view

The only trouble I had with the pattern was the neck gussets, it doesn't specify they need to be gathered - in the middle but not the edges - as pictured below, to make the collar and neckline curve properly.

To ensure the neckline sits properly, gather centre of the shoulder gussets (green arrow), not the sides (red lines)
 
Also, I had a self-made boo-boo. I totally forgot to flip the front neck slit facing around to the back, and only realised it was on the wrong side after I had sewn the shoulder gussets. So I just added a ruffle under the facing, to make it look deliberate...

Pinning a ruffle under the facing which I forgot to flip through to the other side. Doh!
 I think it looks OK,

Neck ruffle and facing detail - not historically accurate...oopsy
 and I bet I'm not the only seamstress to make this mistake in the past 200 years!

May 14, 2014

Historical Sew Fortnightly 2014 - Challenge #8: UFOs & PHDs


My UFO (Un-Finished Object) for the Historical Sew Fortnightly 2014 - Challenge #8: UFOs & PHDs is the Truly Victorian 1873 Polonaise which I started on well over a year ago.

The pattern came together like a dream, even back then with my rusty haven't-sewn-since-highschool skills, until it came to the buttonholes and sewing on the sleeves...

Sure, being well-versed in YouTube tutorials, a stack of library books, in theory I knew how to attach sleeves and make buttonholes, but somehow I was filled with a dread akin to that of a last-minute supermarket run, the day before a public holiday, and so, being scared (and a bit spoiled), I stamped my feet and said, No-won't, too hard!

Sleeve ready to attach...but how?

And thus, I wimped out and this lovely top was hidden in the back wardrobe.

UFO - no sleeves, no buttons. Maybe it could just a be a Pirate vest???

I know I am not alone in my sleeve-attachment-phobia. What is it about sewing on sleeves that seems (cos it ain't really) so hard? Trying to force all that material until the sewing machine arm--not being able to see properly--fabric gets bunched up--argh--now I've sewed a pinch in the fabric--have to do it again!!!

But gentle Readers, there is hope! The answer lies in going back to basics, ie, hand-sewing.

I learned this when sewing my 1888 outfit. Simply prep a doubled-thread onto a needle, wax the thread - waxing is super important, it stops the thread from tangling when you sew.

[>>>How do you wax thread? Take your all-ready-to-go doubled-thread and a beeswax candle, press your thumb on the knot, thus holding the thread against the wax, and with your freehand pull the thread tails upward, so the threads slide between the wax and thumb. Do this twice. Yes, it's that simple.]

Then with sleeve pinned in position to the bodice, back stitch the two parts together. A curved needle helps, but is not essential. Not only does this create a surprisingly strong seam, but I have found hand-sewing quite relaxing.

And so, now my UFO is finished!


The Challenge: Challenge #8: UFOs & PHDs
Fabric: some kind of jacquard, with some kind of brushed broadcloth, maybe. Full disclosure: this started out as a tablecloth and a pair of curtains.

Pattern: Truly Victorian 1873 Polonaise
Year: 1873
Notions: thread, quite a bit of iron-in interfacing

How historically accurate is it? Excluding fabric, 85%, the pattern is very historically accurate (less so with my alterations) but the construction is a 50-50 blend of what you should do, and making-do

Hours to complete: Lost count, started in early 2013...

First worn: Not worn yet

Total cost: $15 - $20


One last note: Being that I am a tinkerer and a meddler, and can never simply follow a pattern,  here's what the Truly Victorian 1873 Polonaise should look like.


Whereas I have shortened the bodice length and altered the curved hemline to a double-point, which you can (kind of) see in this construction picture.


Wait! What about the buttonholes? 

Confession time. I still haven't learned that skill, but I have learned of a wonderful invention called Hook and Eye Tape...

Apr 16, 2014

HSF challenge #7 - In which it's awesome to have a head


Which came first? The head or the hat?
1880s inspired ladies Tall Hat - front and side views


Leaving classic philosophical debates to one side, here's my entry for the Historical Sewing Fortnight 2014 challenge #7 "Tops and Toes" an 1880s inspired Tall hat, which was created to accompany my 1888 costume here.


'before' photo

This is my third attempt at millinery, having made 2 spoon bonnets last year, here and here.

I made this one by taking apart a store bought sunhat (pictured to the left).

I will post a tutorial about how I made this 1880s tall hat soon.


'all done' photo
just the facts:
The Challenge: #7 'Tops and toes'

Fabric: the material is...whatever sunhats are made from. Er.. some kind of thick plastic threads (looks a bit like fishing line) which has been woven into strips.

Pattern: self-drafted

Year: 1880s
Notions: thread and self-made ribbons

How historically accurate is it? not very, this is def. an 'inspired by' design

Hours to complete: About two days

First worn: 28 March 2014

Total cost: under $7

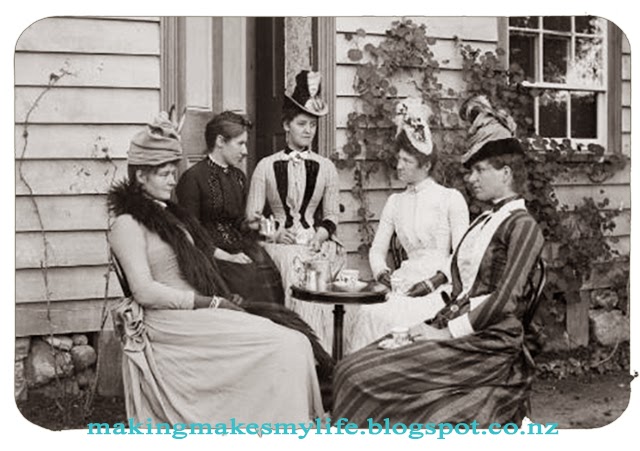
Women having tea outside the house of William and Lydia Williams in Napier, New Zealand. Dated between 1888-1899

The above photo (original source here) from the late 1880s is my favorite inspiration for my Tall Hat design, but you can see more sources by following my Hats or Victorian 1880s boards on Pinterest.

Apr 6, 2014

Sewing Milestone - Creating an 1880s outfit

A year ago as a novice sewer my historical costuming adventures began with my first Victorian Costuming Project, an 1860s Spoon Bonnet, followed by an 1863 outfit to mark the Dunedin Botanical Gardens 150th celebrations.

They were simple projects for a more simple time, chosen to help build up my sewing skills so one day in the distance future I might sew something from my fav decade, the 1880s.

Two months ago I knew I needed a complete outfit for an Images of Past Dunedin event by the end of March and like an American Idol contestant I wasn't going to let dubious skills stop me any longer so I took the 1880s plunge.

Here's what I came up with:

Olden-time posing under the Peasgoode Nonesuch apple tree


As making this outfit coincided [sort-of] with the Historical Sew Fortnightly challenge #5 'Bodice' today I'll talk about the main part of the outfit, the jacket.


My inspiration for the chevron back came from the extant garment below, full details HERE at Bonhams.
Extant 1880s dress with chevron back detail - Source = Bonhams

Details for Historical Sew Fortnightly
The Challenge:  #5 'Bodice'
Fabric: dark blue synthetic outer, poly-cotton inner

Pattern: 
I chose 'Ladies Costume' from the 1888 National Garment Cutter,


By the way, the 1888 National Garment Cutter is available FREE from the Library of Congress, aka the Internet Archive HERE

Pattern printed and back sections cut

I drafted the jacket using Adobe Illustrator, plotting out the Nat. Garment pattern exactly as stated and then merging it with my measurements in the form of a sloper  - drafted for me by a very kind friend, and without which I could not have made the jacket at all. Thank you S.W!!!

Year: 1888
Notions: thread, hook and eyes

How historically accurate is it? 
I give this 8 out of 10 for historicalness. Excluding the fabric's synthetic content, the pattern is 100% authentic, the construction is flat-lined, and sewn entirely on my 1937 Singer No15 which only does straight stitch - no reverse!

The Cat being helpful and my 1937 Singer
Jacket is flat-lined
1880s jacket in construction

Hours to complete: Many! Spread over two months I loss count. I really don't want to think about the time it took least it prove I'm crazy for doing things like this.

Problems encountered: Aside from the masses of time this took, I only had one major hiccup, it turns out I totally have one shoulder lower than the other! Who knew?

1880s Jacket - back not fitting quite right due to 'purse shoulder'...see the wrinkles on left shoulder
Argh - Fitting fail, had to adjust the left shoulder several times...but got there in the end :)

First worn: 28 March 2014, Toitu Museum

I really like this jacket, there's something quite severe about it that appeals to my odd sense of humour. I feel I should be standing outside the Sally Army banging a tambourine and haranguing people about the perils of drink! Hmmm, who can loan me a tamborine?


First worn at Toitu Museum
Total cost: jacket under $20
Fun Times Achieved: Hell yes.


I say, I do love a good silhouette, but does this make my bum look big enough??